How to Fix a Doorbell Button: A Complete Step-by-Step Guide
A malfunctioning doorbell can be quite inconvenient, particularly when expecting guests or deliveries. Fortunately, repairing a doorbell button is a straightforward task that most homeowners can accomplish with just a few basic tools and minimal effort. Whether the button has completely ceased to function or is experiencing intermittent issues, it is typically a problem that can be addressed quickly.
How to Fix a Doorbell Button
This article will provide a comprehensive guide on how to repair a doorbell button. You will discover the potential causes of a malfunctioning doorbell button, the necessary tools for the job, and a step-by-step procedure to diagnose and fix the problem. Let us proceed with the details.
1. Common Issues with Doorbell Buttons
Before diving into the solution, it’s important to understand the common problems that might be causing the malfunction. Doorbell buttons are quite simple, but they can still face issues such as:
- Broken or Stuck Button: Sometimes, the button can get stuck or break entirely, preventing it from working properly.
- Worn-out Wiring: The wires connected to the doorbell button can get damaged, corroded, or loose over time.
- Power Supply Issues: If your doorbell is powered by a battery, it may be running low or completely out of charge.
- Faulty Connections: Over time, connections inside the button may loosen, leading to inconsistent performance.
Understanding these common issues will help you narrow down the problem and tackle it effectively.

2. Tools You Will Need to Fix Your Doorbell Button
Fixing a doorbell button doesn’t require an extensive list of tools. Here’s what you’ll need:
- Screwdriver: To remove the button casing or any screws holding the button in place.
- Voltage Tester: This is especially important if your doorbell runs on electricity. You’ll use it to test whether there’s any power running to the button.
- Wire Strippers: If you need to reconnect wires, wire strippers will help you safely expose the wire ends.
- Replacement Button or Wiring: Depending on the issue, you might need a new button or replacement wiring.
- Drill (Optional): If the button needs to be repositioned or holes need to be drilled for new screws.
3. How to Fix a Doorbell Button: Step-by-Step Guide
Now that we have an idea of the issues and tools, let’s get into the detailed process of fixing the doorbell button. These steps are easy to follow, even for beginners.
Step 1: Turn Off Power to the Doorbell
Before doing any work, it’s important to ensure safety by turning off the power to your doorbell. You can either turn off the circuit breaker that powers the doorbell or remove the battery (if it’s a battery-operated system). If you’re unsure of which circuit breaker controls the doorbell, a quick check with a voltage tester can help confirm that the system is off.
Step 2: Remove the Doorbell Button Casing
Using your screwdriver, carefully unscrew the screws holding the button casing in place. In some cases, the casing may be tightly stuck to the wall, so a bit of gentle wiggling or prying with a flathead screwdriver might be necessary.
Once you’ve removed the button casing, you’ll see the button mechanism and the wiring attached to it.
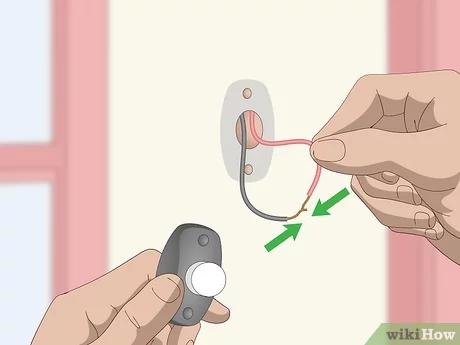
Step 3: Inspect the Button and Wiring
At this stage, it’s important to inspect both the button and the wiring carefully. Check the button itself for any visible damage or wear. If the button is cracked or visibly broken, it will need to be replaced.
Next, inspect the wiring. Look for any frayed, disconnected, or corroded wires. If the wiring looks damaged, it’s best to trim it back with your wire strippers and strip a bit of the insulation off the wire to expose clean copper. If the wires are disconnected from the button or the terminal, carefully reconnect them, ensuring they’re securely fastened.
Step 4: Test the Button
Once you’ve checked the button and wiring, test the button to see if the issue is resolved. Use a voltage tester to ensure that the electrical connections are functioning properly. Press the button to see if it activates the chime or sound.
If the button still doesn’t work, you might have a faulty connection or a deeper issue with the doorbell system.
Step 5: Replace the Button (if necessary)
If you’ve confirmed that the button itself is faulty or broken, it’s time to replace it. Head to your local hardware store or order a replacement button online. When installing the new button, ensure that the wiring is properly connected to the new terminals and that everything is tightened securely.
Step 6: Reassemble and Test Again
Once the new button is in place and the wiring is secure, reattach the casing and screw it back into place. Restore power to the doorbell, and test the button again. If everything is working correctly, you should hear the chime when the button is pressed.
Find the Best Affordable Handyman Services in Orange County | HelloFIX
HelloFIX serves as a platform aimed at linking homeowners in Orange County with the most reputable and cost-effective local handyman services. It offers a swift and effective search mechanism that enables users to effortlessly locate highly-rated professionals for various home maintenance tasks.
Through HelloFIX, homeowners gain access to a carefully selected array of trustworthy service providers, allowing them to make well-informed choices when selecting the appropriate handyman for their requirements.
Whether the need arises for minor repairs, renovations, or routine maintenance, HelloFIX simplifies the process of finding qualified professionals who deliver quality workmanship at reasonable prices.
4. Safety Precautions Before Starting
Before attempting any repairs, always take the necessary safety precautions. Although working with a doorbell button doesn’t involve high-voltage electrical systems, it’s still important to proceed with caution. Here are a few tips:
- Turn off the power: Always turn off the circuit breaker or remove the battery before working on your doorbell button.
- Use insulated tools: If you’re working with electrical connections, it’s a good idea to use insulated tools to prevent any accidental shocks.
- Wear gloves: If you’re handling wires or sharp objects, protective gloves can help avoid injury.
- Double-check connections: Ensure that all wires are connected securely before restoring power.
5. Troubleshooting Other Doorbell Issues
Sometimes, the problem lies beyond the button itself. Here are a few other potential issues to consider:
- Chime Not Working: If the button is fine but the chime doesn’t sound, there may be an issue with the chime unit or the transformer that powers it.
- Power Supply Problems: If you have a wired doorbell, check the power supply or transformer. Sometimes, these components can fail, and they may need to be replaced.
- Loose Wires: Loose or disconnected wires inside the doorbell system can prevent the button from functioning. Make sure all wires are tightly connected.
6. When to Call a Professional
If, after following these steps, you find that your doorbell button still isn’t working or you are uncomfortable working with electrical systems, it may be time to call in a professional. Electricians or doorbell system experts can diagnose and fix more complex issues, such as faulty wiring or transformer failures.
Expert Editorial Comment
In conclusion, how to fix a doorbell button is a relatively simple process, provided you have the right tools and a little bit of patience. By carefully inspecting the button, wiring, and connections, you can often pinpoint the issue and repair it quickly. However, if the problem persists or feels out of your comfort zone, don’t hesitate to call a professional for assistance.
A working doorbell is essential for home security and convenience, so don’t let a faulty button keep you from enjoying its full benefits. Whether it’s a quick fix or a more involved repair, you now have the knowledge to restore your doorbell to full functionality.